Attaining entry to your Netis router’s web interface is key to managing and customizing the settings for your home network. The process is intuitive and accessible even to those without technical know-how; simply enter “netis.cc” or “192.168.1.1” into any browser address bar to reach its login page of their router’s configuration panel and manage everything from security measures to name changes!
On entering the login page, users are prompted to provide both their username and password – this step ensures only authorized individuals gain access to their router settings. After successfully providing their credentials and clicking “Sign in”, users will find themselves at the heart of their Netis router’s web interface where customization and network management options abound, providing an intuitive platform that optimizes home networking experiences for each individual user.
Modifying Netis Network Name (SSID)
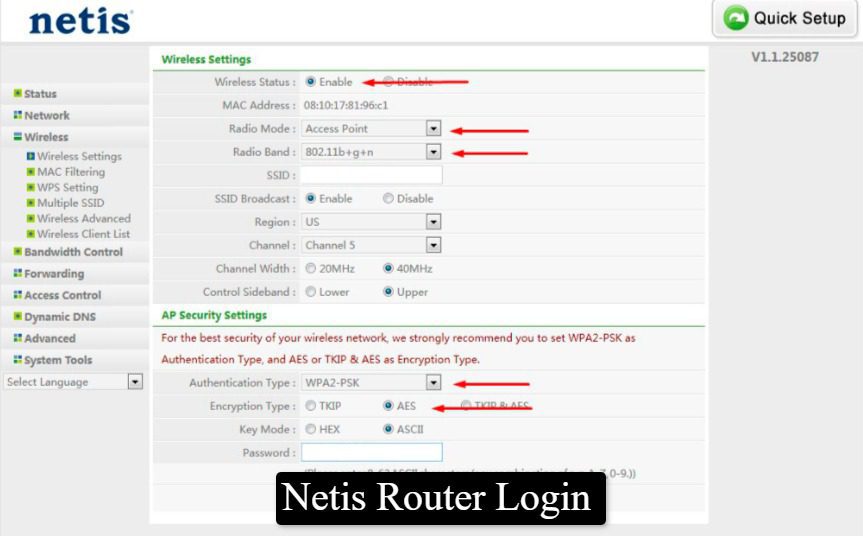
Change Your Network Name (SSID) On A Netis Router To Personalize and Securing ItChanging the network name (SSID) of a Netis router is essential to personalizing and protecting a home network. An SSID appears when searching available WiFi networks; by accessing its interface (http://netis.cc or http://192.168.1.1 and signing in), users can quickly navigate directly to this setting – helping separate their own from others while adding basic yet effective security measures to protect it all the more easily!
As soon as users log into their router’s web interface, they should navigate directly to “Wireless Settings (2.4G)” from the drop-down menu. Dual band router users also have an additional “Wireless 5G” settings option available that caters specifically for altering 5GHz networks. Input a unique name for their WiFi network in SSID field before clicking Save; finalizing changes affects all devices at once while providing easy identification as well as providing basic protection against unwanted access. This simple change enhances user experience while offering basic protection from unwanted access as well.
Updating Netis WiFi Password
Securing your home network with an effective WiFi password is of utmost importance in protecting personal information and avoiding unwarranted entry into it. Netis router interface provides an effortless process to update this important setting with just a login into their web interface allowing them access to essential settings necessary for making this update.
After logging into your router’s menu and accessing “Wireless Security,” navigate directly to this section for changing WiFi password. Here users can select their authentication type – usually “WPA/WPA2-PSK”, for optimal compatibility and security – before inputting a strong new password with letters, numbers and symbols that provides added protection in its password field. Pressing “Save” then immediately applies all changes made within, improving network security immediately – regularly changing WiFi passwords is best practice network management as it protects against threats emerging over time!
- Easy Steps for Router Access:
- Open a browser and enter
http://netis.ccorhttp://192.168.1.1. - Input your username and password, then click “Sign in.”
- Open a browser and enter
- Personalize Your Network Name:
- Navigate to “Wireless” > “Wireless Settings (2.4G).”
- Enter a new SSID and save the changes.
- Strengthen Your WiFi Security:
- Go to “Wireless” > “Wireless Security.”
- Choose “WPA/WPA2-PSK” and set a new password.
By following these guidelines, Netis router users can easily access, customize, and secure their home networks, ensuring a safe and personalized online experience.